Update the MicroStar Firmware


- Details
- Category: FAQ
- Published on Friday, 20 September 2013 02:51
- Written by Gordon Anderson
- Hits: 16078
The MicroStar PC application allows you to program the PIC microcontroller (18F8722 or 18F8723) used in the Encoder. The PIC’s program is stored in FLASH memory and this memory can be re-programmed in circuit with no special hardware. The FLASH is electrically erased thus no need to use any special equipment, all you need is the MicroStar PC application connected to your Encoder. The PIC used in the Encoder contains two programs:
- The boot loader. This program allows the MicroStar PC application to load new programs into the PIC. This enables you to update your Encoder software. This is a very simple program that will likely never change.
- The Encoder software. This is the software that performs all of the MicroStar Encoder functions and is often referred to as firmware.
The boot loader must be programmed using a PIC programmer and a hardware interface, i.e. a programmer such as a PICKIT2. This operation is performed in circuit using the programming connector. This only needs to be done one time. The boot loader is programmed when the Adapter PC board or the rev 4.0 or later Encoder are shipped from the factory.
Re-programming the Encoder software is a simple operation and only requires version 2.0 or later of the PC host interface application. This application is used to communicate with the MicroStar and allows you to save and edit the configuration memory. Additionally this application has an ICP function to allow updating the Encoder software. New versions of the MicroStar software will be made available on my web site, www.mstar2k.com.
Always use the latest PC application and the latest version of the Encoder firmware available on my web site.
Here are the steps involved in programming the Encoder PIC:
- Install version 2.0 or later of the MicroStar PC host application (use version 2.6 or later if you are programming a PIC18F8723). You will not be able to install this version and the older versions of this application on the same PC. The best practice is to unistall the old application before installing a new version. To uninstall, select the control panel, then the add remove programs option, and finally select MicroStar for removal.
- Build the RS232 serial interface cable to connect your PC to the MicroStar Encoder or if you are using the USB interface plug the USB cable into your PC and the Encoder. Test this interface by reading the current aircraft data. To do this following these steps:
• Connect the PC to the Encoder using the serial cable, or USB
• Start the PC application
• Start the Encoder and place in the Cal mode
• From the PC application select the “Read current aircraft” option from the “Link” menu.
• The PC application should say “Selected Aircraft Loaded” indicating the link is working. If you receive a read buffer error, check the serial port to make sure it matches the port you are using to connect to the PC. The port can be selected in the “Options” selection in the “File” menu.
Note: The USB interface built into the rev 5.0 and later Encoder appears to the PC application as a serial interface so you still need to set the port option when using the USB interface.
- Select the “Enable” option under the “ICP” menu selection to enable re-programming the PIC. After you make this selection you will see 5 buttons that indicate the 5 steps needed to re-program the PIC, as seen below:
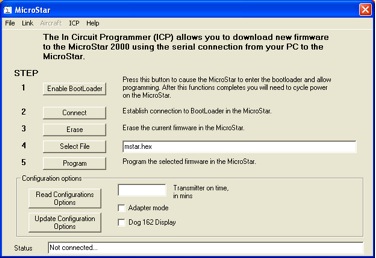
- First you need to enable the boot loader in the PIC. This will cause the PIC to stop running the Encoder software and run the boot loader. Press the “Enable boot loader” button to perform this function. You should see the following message on the status line “MicroStar BootLoader enabled, please cycle power on MicroStar.”. If you receive an error message you can repeat the above procedure or you can power up the MicroStar in the boot loader mode by powering the encoder up with the RUN/CAL switch in the CAL position while holding down the OPTION and AUTO TRIM buttons.
- Cycle power on the Encoder, the LCD screen should be blank.
- Press the “Connect” button, the status line should then say “v250.4Device found...PIC18F8722” or “v250.4Device found...PIC18F8723”. If you do not see a device ID (PIC18F8722 or PIC18F8723) DO NOT PROCEED! If you do the boot loader can and likely will be corrupted.
- Press the “Erase” button, the status line should show the erase progress then display “Finished operation...” when erasing is complete. This is pretty fast and soluble complete in less than a minute.
- Press the “Select File” button and load the mstar.hex file. Use the file section dialog box that appears after you press this select file button to select the file you want to use to upgrade the Encoder, this should be the file you download from my web site and the file should have an extension of "hex". After you select the file the status line should then say “HEX file imported...”.
- Finally press the “Program” button. The status line will show the progress and when complete should say “Finished operation...Not connected...Run mode is set...”. This operation will take a couple of minutes to complete.
- You MUST configure the Encoder software as described below for all versions 2.0f or later.
- Select the “Disable” option from the “ICP” menu. Then cycle power on the Encoder. The Encoder should then ask you to reformat the flash.
The re-programming operation is fast, this whole procedure should only take a few minutes to compete. Re-programming the PIC will cause the loss of all aircraft data and all configuration data including joystick calibration. You should perform a joystick calibration as soon as the re-programming is complete. Before you precede you must perform the configuration outlined below.
Configuring the Encoder software:
Starting with Encoder software version 2.0f and PC application version 2.4 the ICP function contains options to allow you to configure the Encoder software. In the past I had different versions of the Encoder software for the DOG 162 display and for the upgrade adapter version of the Encoder. Now there is only one version that can be configured using the ICP functions. Here are a couple of options on how to perform the configuration:
1. Configuration at program update time.
When you download new software to the Encoder you can and should update the configuration options. Follow the steps described above to update the Encoder software but do not select the disable option after the update is compete. Instead press the Read Configuration Options button to read the current configuration. This will update the selection options, next select the options to want and finally press the Write Configuration Options to send the changes to the Encoder. These options also allow you to reset or set the Battery On Timer to any value you wish.
2. Configuration without program update.
The configuration options can be set at anytime using the following procedure:
- Connect the PC to the Encoder using a serial port as described above.
- Turn on the Encoder with the Run/Cal switch in the Cal position and while holding down the OPTION and AUTO TRIM buttons. After a few seconds let go of the buttons, the display should be blank. This does not erase the Encoder software; it starts the Encoder in the bootloader mode.
- Start the PC application and select Enable option under the ICP menu selection.
- Now you can press the Read Configuration Options and edit the options as you chose. Press the Write Configuration Options to write your changes back to the Encoder.
- Select Disable under the ICP menu selection when you are finished. Make sure you DO NOT press the Enable Boot Loader button or you will have to erase and reload the encoder software.
What if it does not work?
Things can and do go wrong. The most common problem happens when people fail to perform the configuration step or the PC application crashes or for some reason the programming steps are interrupted. The following section described how to recover from these off normal events and hopefully correct the problem.
If you fail to configure the Encoder software and your transmitter is not working, i.e. nothing on the display and the buzzer may be going continuously, this procedure will get you connected to the PC.
- Turn your transmitter off.
- Place the Run/Cal switch in the Cal mode and press and hold the option button and the Auto Trim button.
- Apply power and after a couple of seconds let go of the Option and Auto Trim button. This will start the transmitter in the bootloader mode and allow you to connect to the ICP. You will see nothing on the LCD screen when the transmitter starts in this mode.
- Now connect the transmitter to your PC and sart the PC application.
- Enable the ICP mode.
- Now you can proceed to the programming procedure at step 6 in the procedure above or configure the Encoder firmware as described above.