Dave "The Pipe"'s thoughts


- Details
- Published on Friday, 20 September 2013 02:59
- Written by Gordon Anderson
- Hits: 12086
A REPLY & Addenda to Tony's post ...
Dear Tony:
The PIPE Here again, and I've got a few (actually, MORE than a few) "replies & addenda items" to supplement that well-detailed document you've started a new posting thread here at our group's own "forum".
My reply is structured just like your initial response, so that everyone reading you initial document can understand exactly what I'm getting at with each comment and response.
Now, to the items you've brought up, and what I've been doing for my own MS2K-based, all-single-stick "knobby radio" projects...
(1) Pushbuttons and their switches: Since I've been purloining my now-retired Ace RC Silver Seven knobby radios for most, if not "all", of the control hardware they've possessed since the 1980-81 timeframe when I first built and started using them on 53 MHz AM, the S-7's pushbuttons are used for the "Preset" (which I call a "coupe" switch, per WW I rotary engine parlance), "AutoTrim" and "Option" switches, and existing spare caps give the coupe switch a black button, the AutoTrim a red button, and the Option switch a white button.
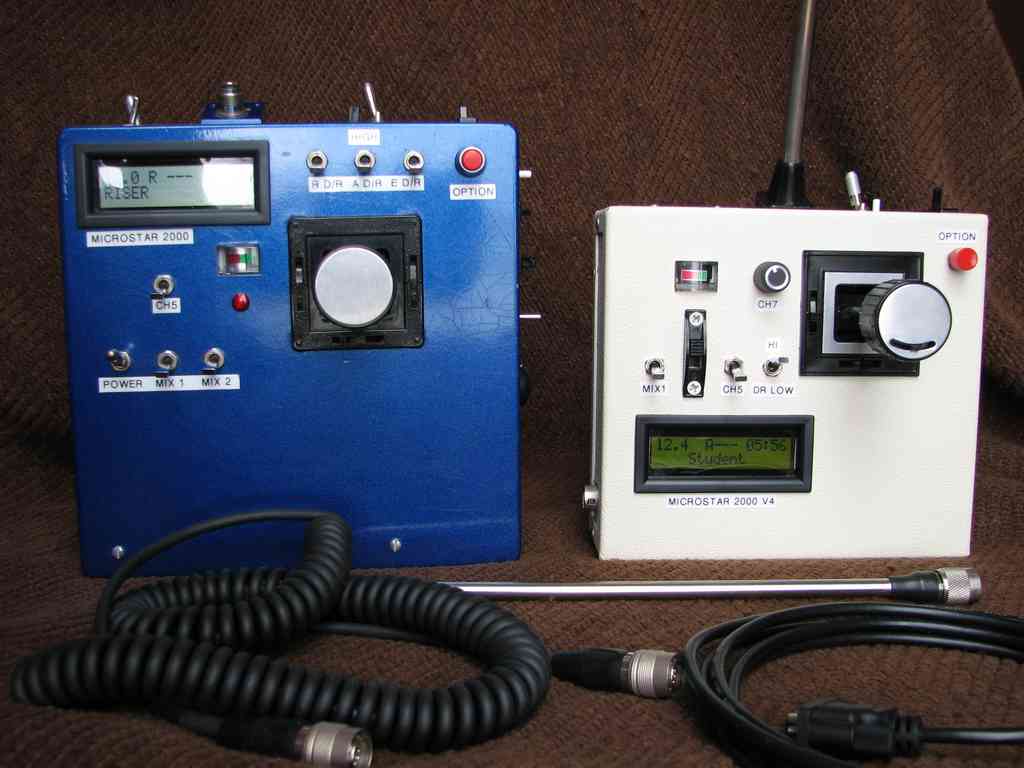
(2) MS2K LCD Display: The pair of "version 3" (or "Mk.III") MS2K, eight memory position encoders that Gordon himself got together for me starting almost a decade ago, use a 2x16 character display that came with the encoder, and isn't backlit, and have connector locations along the long sides of the PC boards that they're built upon.
(3) LCD Mounting: I've used a scratchbuilt, own-design G-10 glass-epoxy mounting "frame" to screw-mount my LCD display board onto, that in turn mates to the inside of the case's front panel using double-sided foam tape that Du-Bro makes for RC gear mounting...it's their #634 foam tape kit, and in their online catalog at http://www.dubro.com/hobby/ecatalog/dubro/00030.htm . The specified bezel in Gordon's parts list, at Digi-Key's page at http://search.digikey.com/scripts/DkSearch/dksus.dll?lang=en&site=US&WT.z_homepage_link=hp_go_button&KeyWords=PRD250LPW-ND&x=26&am! p;y=9 , was mounted to my repurposed Ace MicroPro knobby radio case with Weldwood contact cement, CAREFULLY applied to both the bezel's rear edges, and to the corresponding edges of the case aperture, with a toothpick to prevent the smelly contact cement from "getting out of control" and "stringing" itself all over the place.
(4) Control Pots for Trims & Ch,4, 6 & 7: The Bourns 3852C pots that exist in my trio of ProLine Competition Six knobby radios get used for the Ch.4 throttle controls, with Bourns Model 51 pots used for Ch. 6 & 7 control, all using the "sector"-like control tabs that came from my S-7s. These "sector" tabs all have Du-Bro #139, 1/8th in. wheel collars pressed into their carefully-drilled-out hub areas to "beef up" their ability to be secured to their respective pot shafts. The trims are all the Ace RC 21-step plastic Dunham units, with their stock "discrete" pots for all four "basic" control function trims, with only the throttle trim (on the right side of the joystick opening, mounted to the front panel) needing a Clarostat RV6-style submini pot to take the place of the stock pot in my knobby radio's internal layout, because the original pot connection terminals interfered with the right side control mountings.!
(5) Restoring the Case: I've tried using epoxy to restore, for the short time I was using it again, the case on my #2 S-7 knobby radio to use it again in 2001 before I permamently retired it...it's worked well enough that an MP8K knobby radio I've got, with a possibly good MP8K encoder in it that I've chosen to replace with my own "No.2" MS2K encoder unit instead, will get a classically advertised product named "Liquid Leather" (at http://www.asseenontv.com/prod-pages/LiquidLeatherRepair.html ) used to restore the vinyl cladding over the epoxy-patched areas. The epoxy itself is most likely going to be the oft-recommended JB-Weld kind, as its adherence to metal parts IS hard to beat. Tony's lament at not being able to have an "uneven surface" with his case patching task would be taken care of! with what comes with the Liquid Leather kit, however, as "graining papers" come with it to help hide the patched area's noticeability, and those accessories in the Liquid Leather kit would VERY likely have helped Tony out, with that part of his case restoration!
(6) Finishing the case: The Dupli-Color vinyl spray finishes, on the Web at http://www.duplicolor.com/products/vinyl.html , should they prove to be completely fuel-proof when thoroughly dry, to the FHS Red Max 10% nitro four-stroke fuel I use, would be my pick to do the color with IF I ever chose to give my 50 MHz MS2K knobby radios a "different" color scheme than the ivory vinyl cladding they've already got. I MIGHT do this with Andy Horka's superb choice of Hammond 1455T1601 cases for my eventual second pair of MS2K "knobbies", that will be built from the ground up to use Futaba's TM-8 FASST Tx modules. The Liquid Leather kit has several different colors to allow for rather precise color matches when patching up a vinyl-clad case, and my own pair of upcoming 50 MHz MS2K knobbies, as well as the 2.4 GHz pair of MS2Ks, wil! l all be wearing main placards (the ones surrounding the "main status display" on the front panel) I'm designing here at home in CorelDRAW 12 and Corel Photo-Paint, that feature "MicroStar 2000" lettering using a freely-available version of the "Koloss" font that Ace RC used for their logo (located at http://www.fontspace.com/thomas-e-harvey/coliseum ), and featuring a constant vintage World War I aviation graphic theme based on classic Old Rhinebeck Aerodrome WW I-era aircraft photos as their color backgrounds, for my "Rhinebeck Scale Special" RC radio theme on all my MS2K knobby radios.
(7) Switches: I've already posted up the so-called "Combo Switch" hookup diagram at http://groups.yahoo.com/group/MP8K/photos/album/329764481/pic/596420608/view?picmode=&mode=tn&order=ordinal&start=1&count=20&dir=asc , that COMBINES the main power switch and the "Cal-Run" switch into just one, three-position ("OFF-CAL-RUN") locking toggle switch...the best bargain for these nowadays is at http://www.onlinecomponents.com/buy/C-K-COMPONENTS/7411K2ZQE/ ...I recently got FOUR more of these, for all my future planned MS2K knobby radio projec! ts. The flat handle SPDT toggles for the two switchable mixers, and for Channel 5, are C&K units as well - the Ch.8 SPDT three-position switch just uses a regular round bat handle. My dual rate switches are SPDT ROCKER switches, again from my S-7s, and are available as C&K part #7101J16ZQE22 ...these switches can be obtained from the same source as the "combo switches" are, at http://www.onlinecomponents.com/buy/C-K-COMPONENTS/7101J16ZQE22/ .
(8) The Gimbal (and Knob): I planned way ahead of time on this MOST critical issue, in getting a number of BOTH MP8K and ProLine knobby radios starting just over a decade ago. John Eyer's excellent choice of the Bourns 3852A pots for the Ace RC metal gimbal joystick, as a replacement for Ace RC's own joystick pots, is just too good a match for those...now we've got Andy Horka reproducing the Ace RC metal gimbal unit!!! For anyone who's got the all-plastic Kraft/Heathkit rudder knob, or the Dunham all-plastic knob, please remember that the old-style servo pot resistance wafers & wiper assemblies ALWAYS came from military specification "RV6" style subminiature pots. The old Kraft/Heathkit "metal backshell" rudder knob, that had that long machined aluminum rear section to the knob, actually USED a completely intact "RV6" style discrete pot for its resistance unit. When I can eventually get back! to a daytime job, and afford to actually DO it, I'd love to make a new rudder knob design available...it's closely based on the JR Century Seven & PCM 9 knobby radios' rudder knob in dimensions and physical size, and uses a Bourns 3852C pot, which is not very different in dimensions from the Asian-sourced pot that JR used in their rudder knobs two decades ago. The knob I'm working on also is intended to ONLY use corrosion-resistant metal parts (think stainless steel here, even possibly the rudder knob centering spring!) and has all of its unique-design metal parts that need to move, riding on teflon washers and a teflon main bushing for a very smooth rotational feel.
(9) The RF Deck: Where I've been "KA1ABG" for a third of a century now, going for 50 MHz is a no-brainer...Gordon's own 50 MHz synthesized deck is still the best choice for this need, and I simply used the Ace RC antenna mounts from my S-7s, with Futaba's "ANT6", or "FUTM5050", one meter long collapsing antenna for my 50 MHz flying needs, which IS the closest available VHF RC Tx antenna to the old Ace RC units, and even fits the same metric threaded screw that the Ace RC antenna mounts use. For the increasing appeal of SpredSpec 2.4 GHz flying, with that whole band still being in a "semi-experimental state" even now, the good reviews on the Futaba FASST system have got me going for it quite solidly. The TM-8 FASST module simply is the slickest, least complicated 2.4 GHz signal-sending solution I've yet seen, with no...and I mean NO...exposed wires sending the signal into its integral swiveling an! tenna, something which IS present on the Spektrum and XPS units, and which turned me off to those right away, as soon as I spotted it !
Everyone, of course, likes to make their own choices to make on how to build their own MS2K-based RC radio, be it a knobby unit or dual stick Tx, based on what they can get to hook up their encoder with, available control setups, cases, etc...it's just that with Tony's excellent post here to "open up" this thread with, I felt I needed to provide my own accounts on my MS2K-building experiences so far. I'm really looking forward to someday "prototyping" up the new rudder knob, and with Bourns 3852-family pots on ALL three aerodynamic control channels, the "balance" between the elevator, ailerons & rudder is bound to be more equitable...
...now to go back to some more CAD home-based drafting to help all these things along!
Yours Sincerely,
The PIPE at This email address is being protected from spambots. You need JavaScript enabled to view it.
;) !!